In this post, I build a HardMPU board and use it to add midi capability to my Xi 8088 home built PC
Background
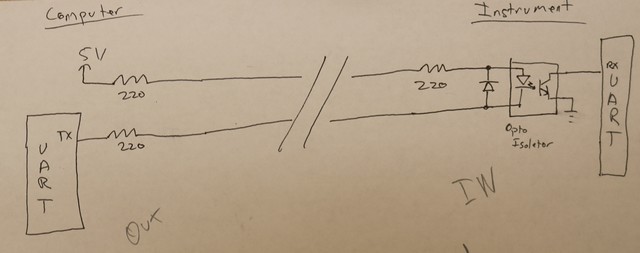
Midi stands for “music instrument digital interface”, and is a relatively simple protocol for controlling musical instruments. A midi controller can be a computer, or a keyboard, a sequencer, or any other device that can generate control messages. Those message are then sent to the instrument, typically causing it to play musical notes, though midi can also be used to control other devices, such as lighting. There are two popular variants of midi, the modern “USB Midi”, and vintage midi, which typically uses 5-pin din connectors with a two-wire interface that operates at 31,250 baud. This blog post will concern the vintage midi variant, using the 5-pin din connectors. Let’s take a look at a simple diagram:
As you can see, there’s usually a UART or similar device on each side of the connection. The transmitter sends data, and the receiver receives it via an optoisolator. There are 220 ohm dropping resistors (three of them, for a total of 660 ohms). The interface operates on 31,250 baud. A single midi connection is unidirectional — OUT connects to IN. If you want communication in the opposite direction then you need a second set of ports, connecting OUT on the instrument to IN on the computer. Midi devices often have three ports — IN, OUT, and THRU. THRU is typically connected to IN, and allows the connection to be daisy chained to additional devices.
Midi Modules for DOS Gaming
So what did people use midi for back in the 1980s? If you were really into computer games, Sierra adventure games in particular, then perhaps you owned or wished to own an MT-32 midi module. Compared to an AdLib, I think the sound quality is much better. I never owned an MT-32 back in the day, but I always wanted one. Now that I’m much older, I have the opportunity to run a real MT-32 on my vintage computer rig. You can find these things on ebay from time to time.
Another popular alternative was the Roland SC-55. I happen to now possess both an MT-32 and a SC-55. The SC-55 and MT-32 differ in the sound banks that they have — the selection of instruments between the two modules is different. This leads to some compatibility issues, if a game expecting an MT-32 is connected to a SC-55 or vice-versa. Fortunately, the SC-55 does support MT-32 emulation, though it has some limitations compared to a real MT-32.
An SC-55 is probably more useful to a musician or someone who plays slightly later computer games that expected a general midi instrument bank. The MT-32 is more useful to someone who wants to play early computer games.
UART Mode Versus Intelligent Mode
Early midi on the PC often used a device called the “Roland MPU-401”. The MPU-401 operated in one of two modes, UART or Intelligent. UART mode is the most basic of the two, and requires the host computer to compose the messages and send them at the right time. This means the host computer has to be keeping track of time, so it knows when to send each note on and each note off message. Real-time tasks like this could be burdensome in early PCs, where a typical adventure game would also be responsible for redrawing graphics, querying input devices like keyboard and joystick, reading data from the disk, etc. For this reason, the MPU-401 offered Intelligent Mode.
Intelligent Mode is effectively a midi coprocessor. A separate CPU with its own RAM and ROM implemented rudimentary midi sequencer functionality. Whenever the coprocessor becomes idle on a particular track, it queries the host computer for the next note (and time delta) to play for that particular track. While the host computer still needs to store the content of the song, and to send the appropriate notes and deltas, it is no longer responsible for the timing itself. The host says “Play note 15 on track 3 in 82 ticks from now”, and the coprocessor is responsible for counting out those ticks and playing the note at the appropriate time. This meant the host no longer was responsible for realtime midi sequencing.
Unfortunately, while early midi hardware (such as the MPU-401) supported intelligent mode, later hardware (such as sound blaster variants) typically do not. This is because later sound hardware ran on more modern computers, such as 386 or 486 PCs, which were capable of doing the realtime midi sequencing and didn’t need a coprocessor. The coprocessor was additional cost, so it was dropped. Modern games were written to use UART mode.
Many early DOS games, such as popular early Sierra adventure games, used intelligent mode only and did not support UART mode.
Okay, so I want to play early DOS Games on my retrocomputer, what do I do?
There are a few options:
1) Buy an MPU-401 or compatible card. Vintage MPU-401 and compatible cards may be prohibitively expensive for the casual collector or vintage computing enthusiast. I’ve seen MPU-401 compatible devices go for over $500 on ebay, which is a steep price to pay. The nerdly pleasures blog at http://nerdlypleasures.blogspot.com/2010/03/tutorial-how-to-get-roland-mt-32.html has a nice rundown of the various options. You might be able to find a deal on one.
2) Run SoftMPU. SoftMPU is a software emulator that emulates intelligent mode on top of a UART interface. SoftMPU needs to intercept port reads and writes, and you’ll need to run QEMM or EMM386, which is going to require a 386 or newer PC. If you have a 386 or newer, great. You can run SoftMPU.
3) Buy a clone. There’s a guy over at vogons who is selling new manufacture Music Quest clone cards. My understanding is that this is a period-accurate reproduction.
4) HardMPU. HardMPU is another project I discovered over at Vogons. It’s led by a user, ab0tj (thats a-b-zero-t-j), who ported SoftMPU to run on an atmega microcontroller. The atmega is able to interface with the correct ports on the ISA bus at a hardware level. This means you don’t need to run QEMM or EMM386, and you don’t need to run a 386 or better CPU. For example, you can use it on an 8088 or a NEC V20. A game expecting an MPU-401 will detect the HardMPU just like it was a real MPU-401 device. It “just works”.
Since I have an Xi 8088, SoftMPU was out of the question. I couldn’t find a real MPU-401. The guy doing the Music Quest clones didn’t have any available at the time. So, I chose to go the HardMPU route.
Building a HardMPU
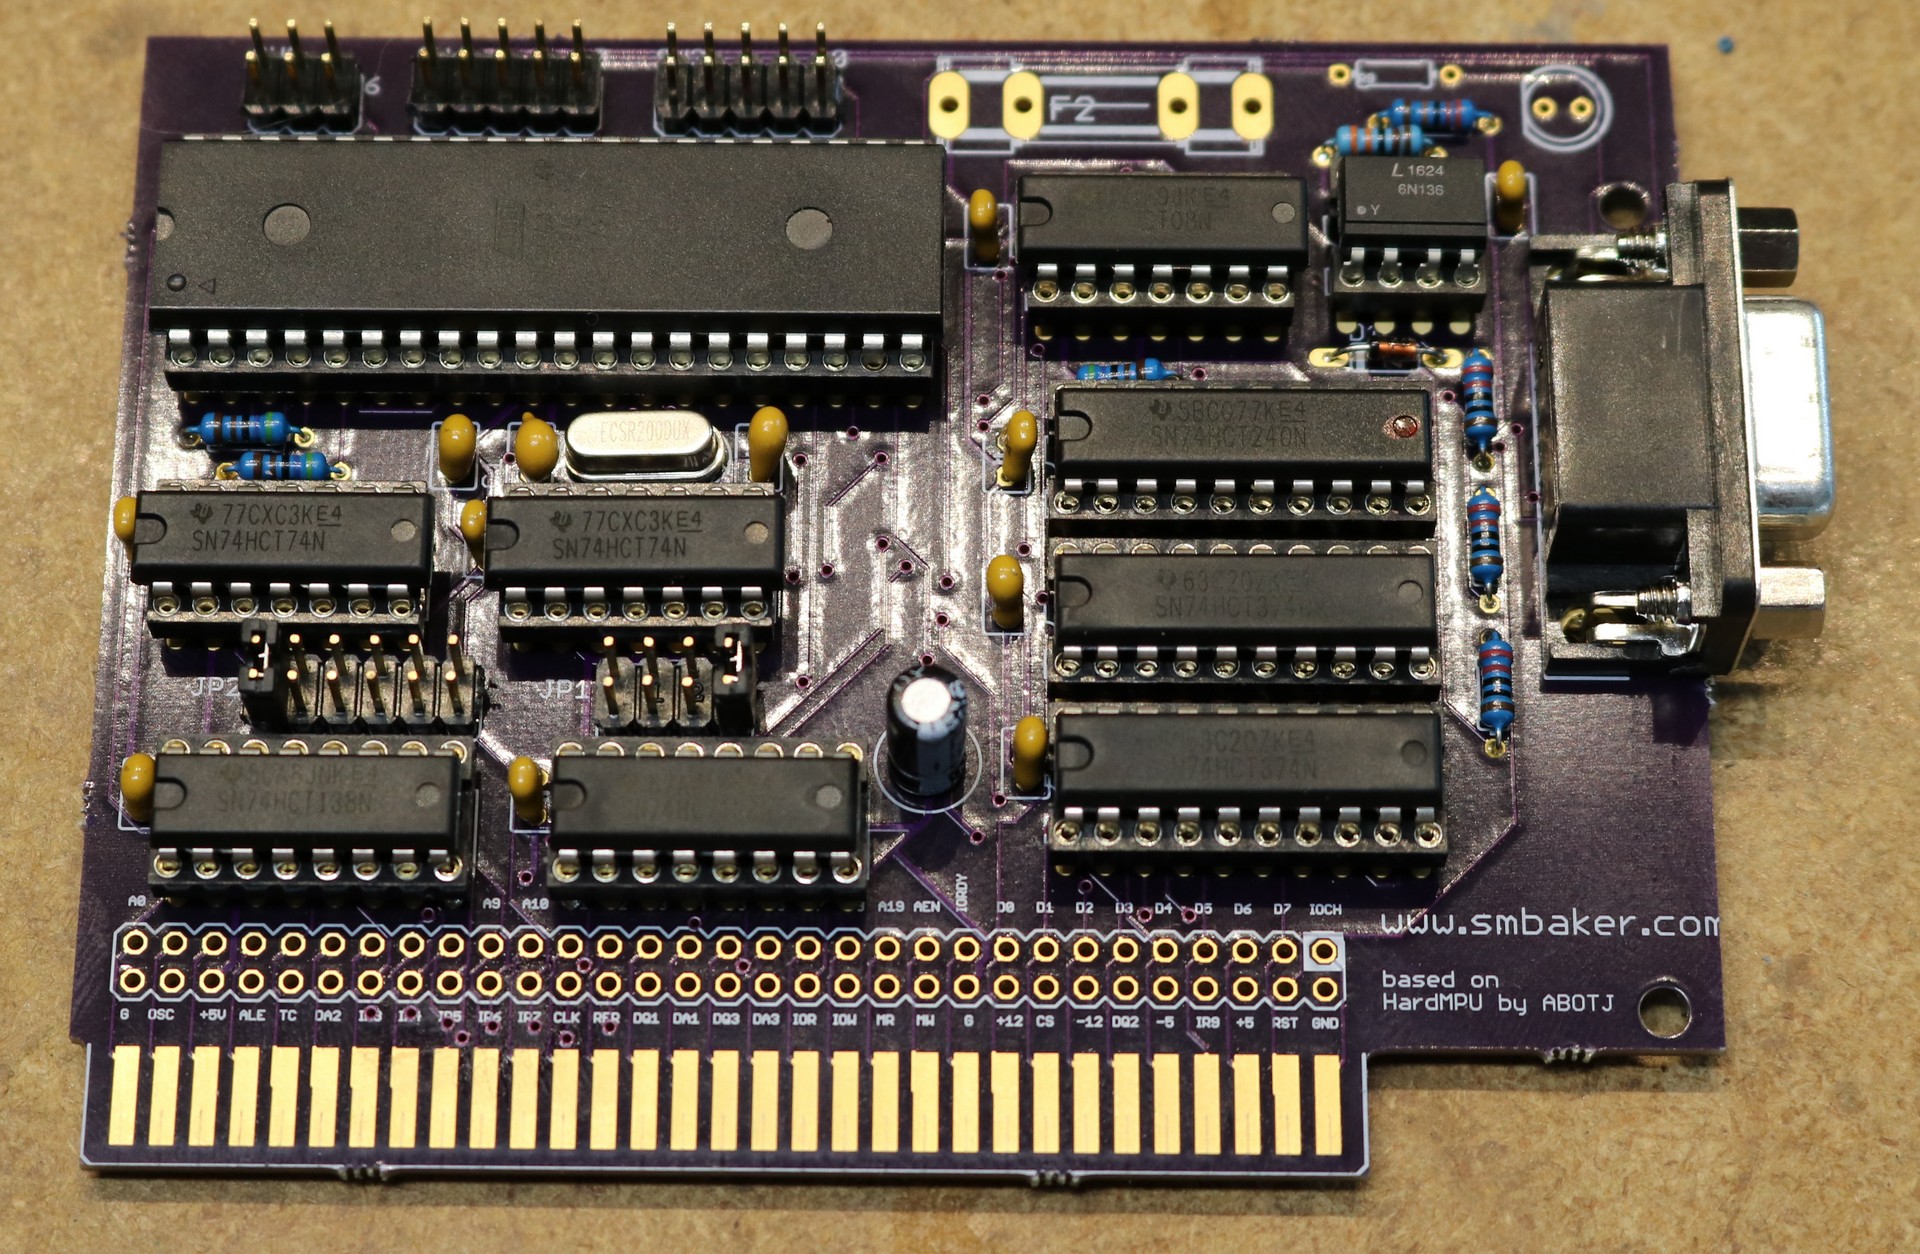
Ab0tj sells PCBs and kits, and you can probably find him in his Vogons thread. His design is available on github at https://github.com/ab0tj/HardMPU. I jumped the gun and built a board using the schematic from his repository before the official boards were made available. So my board differs slightly from his production boards. Here’s what mine ended up looking like:
As I said, it differs from Ab0tj’s board in a few ways. A typical smbakerism, it has the dual row 0.100″ header that I’ve been putting on all my ISA cards that would in theory allow my bus terminator or another board to be stacked on it. Also makes a great place to attach logic analyzer or oscilloscope probes. Another smbakerism, I added a footprint for a LED (which I haven’t used yet), because, well, LEDs are cool. I guess like a child I’m inherently drawn to bright blinking lights.
Board availability
Unlike my usual boards, I haven’t made this one available on Osh Park. Ab0tj put a lot of work into this, he sells boards and kits, you should just buy from him.
Software
In addition to playing games, I wanted to figure out how to program an intelligent-mode MPU interface, and I wanted to do it in a period-accurate way. So I sat down with Turbo Pascal and programmed myself a MIDI player. With the MPU-401 technical manual in hand, I managed to put together a functional midi player in about a weekend. There are some limitations — for example, the MIDI format supports 16 tracks but the MPU-401 only supports 8 tracks. Nevertheless, I’ve tried it out with a handful of midi files that I managed to find on the web and it appears to work reasonably well.
You can find my player at https://github.com/sbelectronics/midiplay

