How to Turbo a Volkswagen engine for under $100
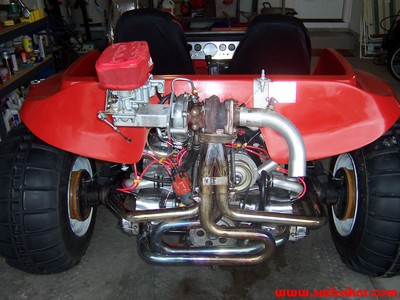
I started this project one day with the goal of turbocharging my stock 1600cc VW engine on the Manx. The goal was to do it all for about a hundred bucks, including of course lots of parts already on-hand. Of course, goals are made to be broken, and the project ended up costing about $400 – $500 due to needing to carbon seal the turbo, but that’s life!
So let’s start with what we had on hand:
- Mostly-stock 1600cc vw engine
- Tri-Mill exhaust
- Weber progressive carburetor (32/36 DFEV)
I looked at some of the websites at other draw-through Turbo setups, most going for $2000 or more, and I thought to myself, what the heck is all that money for? One popular drawthrough turbo kit uses the same carb that I already had so I knew I must have been on the right track. It seemed to me that some junkyard shopping, plus my existing exhaust and intake parts should be able to put this project together.
Step 1: Junkyard Shopping
- The first step is to find a usable turbocharger from a junkyard. Of course, one option is to buy a rebuild turbo from a mail order outfit, or to find a rebuilt or used turbo on ebay. Well, that would cheat you out of all the fun that you’ll have spending an entire morning trying to get a turbocharger out of an old hulk of a vehicle in your local junkyard.The turbo that I chose is the IHI RHB5 series of turbochargers, used in Subarus from 83-89 or something like that. The 83 Subaru used an aircooled Turbo which would have been nice, but I ended up with an 86 turbo that is both oil and water cooled. Don’t worry, as long as you’re careful and let the engine idle for a minute or two before shutdown to keep from cooking the bearings, you can safely ignore the water jacket in the turbo. The Subaru was a 1.8 litre engine, not too far off from the 1600cc vw, so I figured it to be a reasonably good match.
You’ll find a turbocharger to be one of the more difficult items to remove in a junkyard. At first, I had my eye on a nice garret T3 in a chrystler, but after fighting for about an hour trying to get to the damn thing I gave up. Then I spent a couple of hours working on the Subaru turbo. Of course, one exhaust bolt wouldn’t come loose with a box wrench, and there was no way to get to it with a socket due to parts being in the way. Rule #1 when visiting a junkyard, bring hacksaw (or better yet, a torch if they let you). Hacksawing the exhaust manifold in half was no easy task, but eventually, I got it loose and got the turbo out. Make sure to get the oil fitting that came with the turbo; it will probably have some fancy banjo fittings on there that’d be a pain to have to come up with later.
Okay, so $50 to the jankyard and some bruised knuckles, and I was on my way home with a used, but functional IHI RHB5 turbocharger.
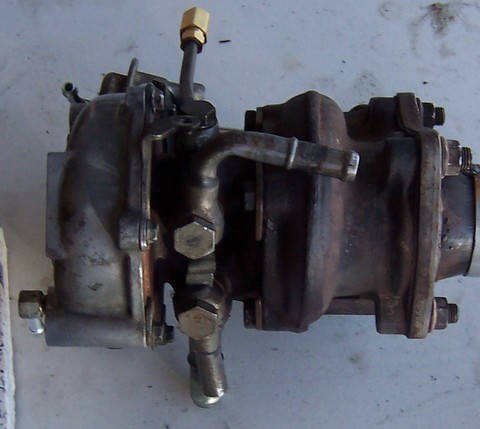
Word to the wise: There are two different types of seals in turbochargers: dynamic (aka piston) and carbon (aka positive). The carbon seal is suitable for either blow-through or draw-through applications. Dynamic seals are suitable for blow-through only! I repeat, you cannot use a dynamic seal on a draw-through turbo system. This is important. Ideally, you would select a turbocharger that came with a carbon seal already in it, and save youself a lot of headaches later. Unfortunately, carbon seal turbos are a rarity, because the newer dynamic seal is more efficient, and well suitable to the fuel injected engines that are used these days. So, the moral of the story is if you want a draw-through setup, either a) find a turbo with a carbon seal, or b) rebuild your turbo and convert it to carbon seal.
Step 2: Exhaust Fabrication
- The tri-mill exhaust seemed like a natural fit for the turbocharger. The tri-mill’s collector was already more-or-less where I wanted to fit the turbocharger. Here is the picture of the tri-mill before I decided to take the cutoff saw to a perfectly good exhaust system:
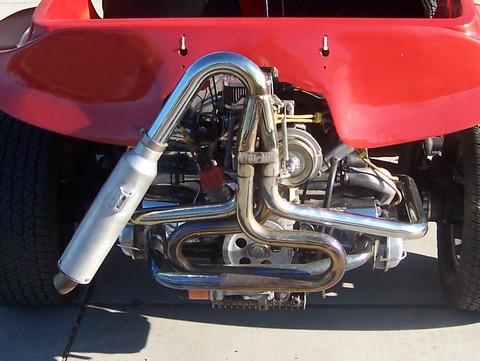
Okay, so the first step is to take the nice tri-mill exhaust and chop it off at the collector. Right after the pipes merge, and before the elbow. Then, you’ve got to either buy or fabricate a flange to mount your turbocharger. There are mail order outfits that can sell you a nice flange for several different turbo patterns. I chose to fabricate my own on my sherline milling machine. The local metal dealer gave me some scrap 1/4″ plate (freebie! freebie! freebie!). Load it up in the milling machine, and cut out the appropriate pattern. Unfortunately, I didn’t take pictures of any of fabrication of the flange, so you’ll just have to take my word for it.
Step #3: Turbo-To-Engine Intake Fabrication
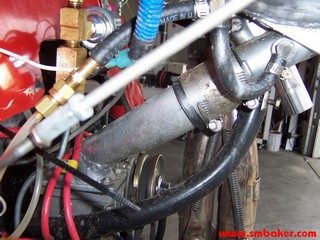
- Next step is to fabricate a pipe to connect the compressor discharge of the turbo to the intake of your engine. My weber DFEV kit came with a reasonable nice manifold, so I decided to keep it where it is, and I fabricated a flange and pipe to connect the DFEV manifold to the compressor.
 |
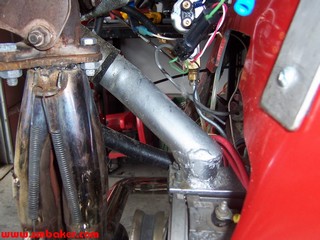 |
| Driver’s side of intake manifold | Passenger’s side of intake manifold |
The little bend in the pipe was accomplished with my harbor freight pipe bender, which doesn’t do a real good job of bending pipes without kinking them, but if all you need is just a little bend, then that’s good enough…
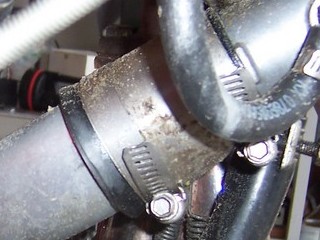
A rubber “sewer pipe” connector connects the manifold to the compressor outlet. You can find these fittings at the local hardware store. They are a flexible rubber tube with some hose clamps. I was a little afraid it might melt or something, but it didn’t, so there….
Step #4: Carb-To-Turbo Intake Manifold
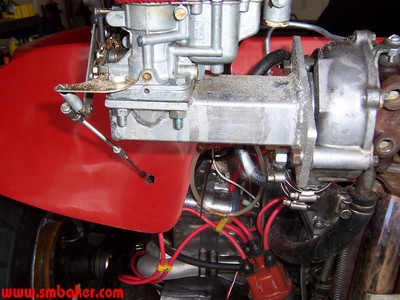
- The final manifold that needs to be constructed is the one that will connect your carb to the compressor inlet of the turbocharger. Fortunately, I had enough scrap laying around the shop to fabricate this.The first step was to make a flange to mount the carb. I used an old gasket as a template, and traced the pattern onto some 1/4″ flat stock and again used the sherline to mill out a nice looking part. Some decent metal holesaws (metal cutting holesaws cost about $12 each plus arbor; avoid the cheap black wood-cutting holesaws) will cut the round holes for the carb air passages.
After the carb flange was made, I used some rectangular stock and milled another flat plate, bolted it all together and now we have our finished manifold
I did go ahead and pressure-test all of the manifolds. This was done by blocking both ends of the manifold, and applying aircompressor air, then squirting soap on the welds. If you have a leak you will see bubbles. You’ll probably need a helper to do this as one guy has to block the ends of the manifolds, and the other guy can squirt the soap on it.
Step 5: Oil Connections
- Your turbo needs oil for lubrication and cooling. The oil supply line can be very small (1/4″ tubing is sufficient), but the discharge line needs to be very large, at least 1/2″ or even 5/8″ rubber tubing. This is because the turbo is fed by pressurized oil, but drains by gravity.This is important: You must ensure the following:
-
- Your turbocharger must be mounted above the oil level in the engine. If not, you will need to use a scavenge pump to get the oil out of the turbo.
- The oil discharge line must follow a downward slope. Horizontal spans should be avoided. Absolutely never should the oil discharge line go upwards.
- The line must be big. At least 1/2″ tubing.
- The line is supposed to return above the oil level in the sump. You can probably bend this rule a little bit if you return near the top of the oil level, because at high RPMs the engine will be flinging the oil out of the sump into the 3-4 valve cover.
- Avoid returning oil to the 3-4 valve cover as it tends to fill up with oil at high RPMs
 |
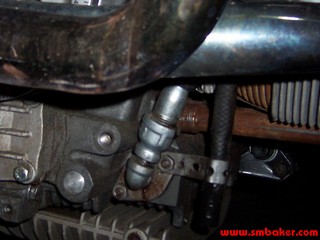 |
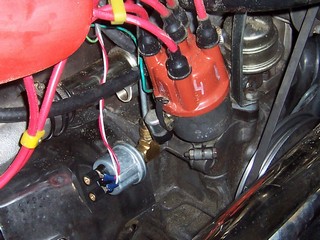
| Oil supply for the turbo comes from a “T” inserted into the oil pressure gauge port. | Turbo oil returns to type-3 blockoff plate. Technically it’s better to return above the oil level. |
- Good places to return your oil are:
-
- The fuel pump opening, if you do away with the mech pump and replace it with an electric pump
- The 1-2 valve cover
- The oil filler tube (if your turbo is really high)
- The alternator stand, if you have no alternator, or have a custom stand.
- The type-3 blockoff plate if you have a universal case
- The sump (preferable above the oil level
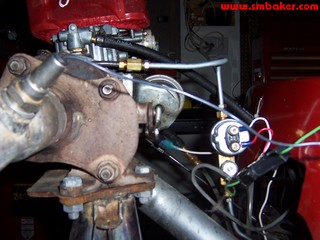
As far as pressurized oil is concerned, the feed from your turbo can be taken from the oil pressure switch. Just install a “T” fitting. VDO makes a M10 tee fitting that fits perfect, or a 1/8″ NPT should also fit reasonably well. Your turbocharger requires very little oil, so a small feed line can be used. I used a 1/4″ brake line.
You may even need a restrictor for the oil inlet to your turbocharger. This is because turbos require surprisingly little oil to operate. Mail order and web outlets can sell you a nice restrictor for your garret T03 turbo. I believe the size of the restrictor is 0.060, but don’t quote me on that, and do some research yourself. Another option, and the one I used, is to purchase a needle valve and a fuel pressure gauge, and then you can restrict the turbo oil pressure to whatever you want. Personally, I have mine adjusted to give about 5-15 psi of oil pressure while the engine is hot. Cold oil will have more pressure than hot oil.
Step 6: Ignition
- I used a bosch 009 distributor with no trouble.If you’re going to be running a lot of boost, then you may want to do some funky things with the advance and/or retard.
A rev limiter might be a good idea, as you’ll find your turbo engine will very quickly rev up beyond redline if you’re not paying attention.
Step 7: Fuel delivery
- In my instance, the stock mechanical pump was sufficient to supply the DFEV carb. Drawthrough setups generally do not require a “rising-rate” or “boost-sensitive” regulator.
Step 8: Boost Control
- You’ll need a wastegate, either built into your turbo or seperate. My IHI RHB5 came with a wastegate built in preconfigured to 7.5 psi of boost, and for now that’s good enough for me.The job of a wastegate is to bleed off exhaust pressure when you start to get too much boost. It does this by sensing the boost pressure developed by the compressor. When the boost exceeds a certain amount, the wastegate opens, allowing some exhaust to bypass the turbo. This regulates the turbo speed back down, and keeps your boost in line.
There are ways to regulate a built-in wastegate if you need to. There are devices called “manual boost controllers” that you can buy; try looking at some catalogs for sport-compact cars, and you should be able to find one.
Step #9: Rebuild the damn turbo and retrofit it with a carbon seal
- Okay, I got everything above done, and fired up my turbo for the very first time, took a ride around the block, and uh-oh, clouds of blue smoke everyone. You know — frightened neighbors running for cover — that sort of thing.Here is where we talk some more about the difference between dynamic seals and carbon seals….
A dynamic seal uses a couple of piston rings, much like the rings on the pistons in your engine. As you should know, a piston ring isn’t a 100% seal. There’s a little gap in the ring. For a blow-through turbocharger, this is fine. The compressor will always be pressurized, and no oil will get sucked through that little ring gap.
However, when you have a draw-through setup, the carb is mounted on the intake side of the compressor. Thus, any time the throttle is closed, there will be manifold vacuum inside the compressor housing. Think about it — most of the time when you’re not accelerating, there is manifold vacuum. If you have a dynamic seal with the little piston rings, then this manifold vacuum will suck the oil out through that little piston ring gap. It’ll suck the oil right into your motor, and you’re engine will run like some idiot put 2-cycle mix in the gas tank. This is bad. You’ll foul your plugs and upset your neighbors. The oil will reduce your octane, and you might even get detonation.
The carbon-seal, on the other hand, has a spring-loaded ring that presses against a thrust collar on the turbine shaft. There is no “gap” in the carbon seal; it seals all the way around. It’ll keep that oil in there, even in the presence of manifold vacuum in the compressor housing.
So, this is where the project started to cost money. $150 for a turbocharger rebuild kit. $40 for a carbon seal. Then, when all the parts do get here, we notice that the carbon seal needs a special “thrust collar” that isn’t part of the regular rebuild kit. So another $30 + shipping for a thrust collar, and another week. The $50 turbo ended up costing a total of $290 after all of the rebuilding was complete.
[See article on IHI RHB5 turbo rebuild]
But, at least I have a freshly rebuilt turbo!
Step #10: Carburetor Tuning
- Surprisingly, the little weber DFEV carb does pretty well with the out-of-the-box configuration. The “stock” configuration of a 32/36 DFEV is:
-
- primary: 60 idle, 137 main, 165 air
secondary: 50 idle, 140 main, 160 air
In the stock configuration, the vehicle ran fine, but there was considerable stumble off idle, and some hesitation in the midrange as well. I’m running 10 degrees of advance at idle on a Bosch 009 distributor using premium pump gas. I upped the primary idle jet to 65 and the primary main to 140 and got better results. Unfortunately, I was having such a good time trying out the new jetting that I completely destroyed the clutch, and my turbo days are down until I get the clutch replaced. So the definitive results of the jetting are going to have to wait a little while…
To be continued…
Step #11: Clutch
- The stock clutch is not up to the task of handling your newly turbocharged engine. I had a stock clutch in my Manx and it worked fine until one day it slipped in 3rd gear and I didn’t catch it in time. Personally, I have never destroyed a part to the extent that I destroyed that clutch. The pads on the front side of the clutch were reduced to a pile of black dust, and the pads on the flywheel side were crumbling apart. The guide that the throwout bearing slides on got toasted. It was a Sachs clutch, and had about 10 hours use on it before it went.My recommendation would be at minimum using Kennedy Stage 1 pressure plate. They are supposed to be good to about 150hp. Above 150hp, go for a Stage 2 pressure plate.
The local VW shop has recommended against putting in more clutch than you need. The theory is that it’s a lot easier to replace a trashed clutch than it is to replace a trashed transaxle or sheared dowel pins.
What type of car did you pull the turbo off of? Do you know what car to look for in wrecking yard for turbo or belt driven super?
It’s been a long time and my memory is fuzzy, but my notes say it was an 86 Subaru
I used a turbo front a Nissan Pulsar Nx
7 1 /2 pounds boost. Used a Saturn twincam fuel injection with 40-50 lbs fuel pressure. Up from the 31-38 pound . With the injection I don’t need the distributor. Needs premium gas gets about 26 mpg never runs hot. Oil temp is 205.