Introduction
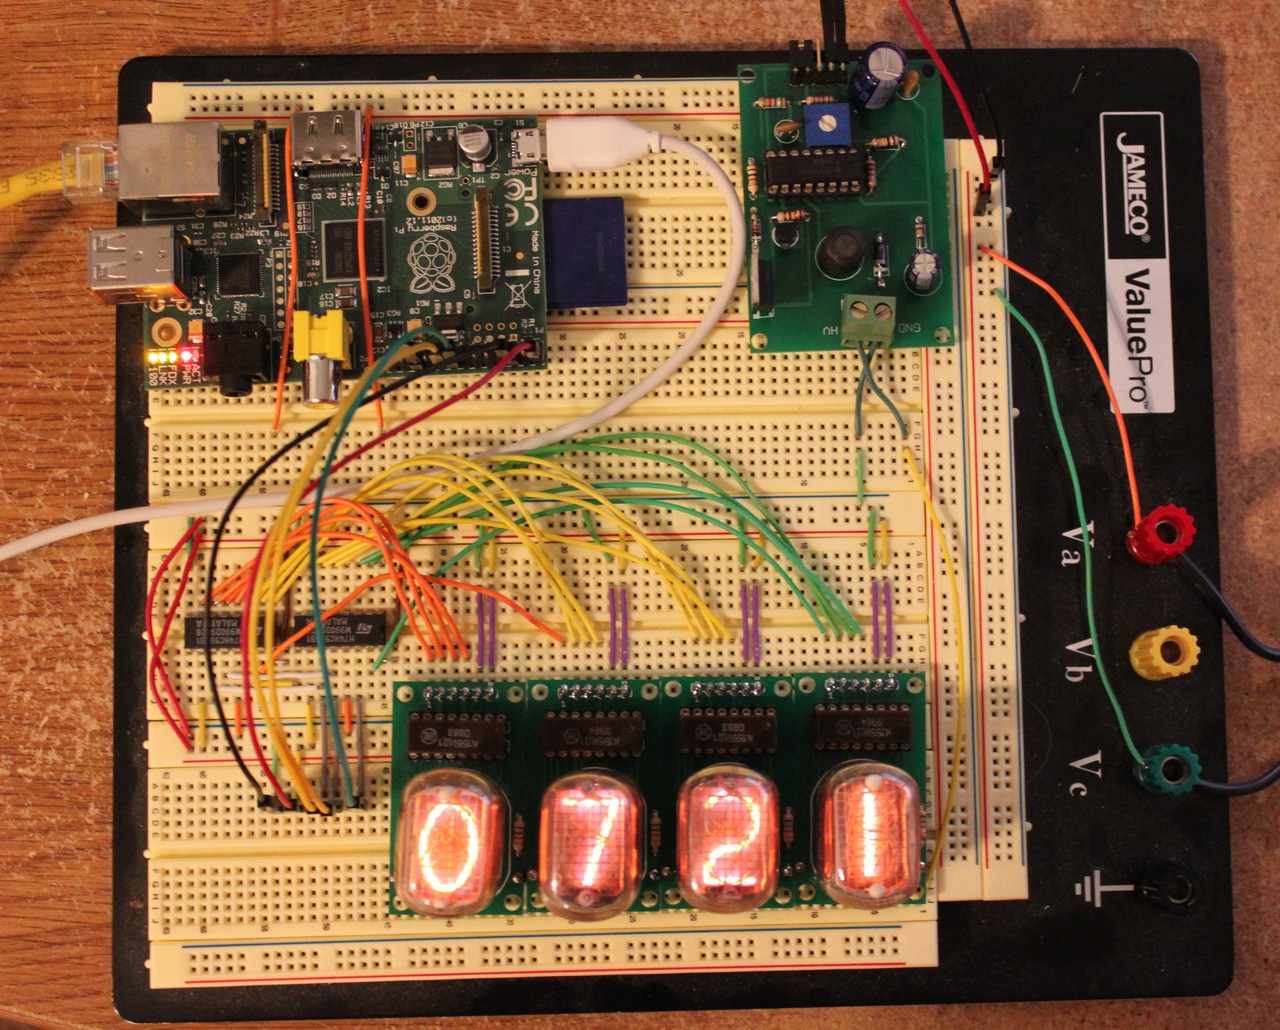
I’ve built several Nixie Clocks, most of them based on the Propeller Microcontroller. This time I decided to put one of my spare Raspberry Pis to use, and show a little bit of insight into my design process.
The High-Voltage Components
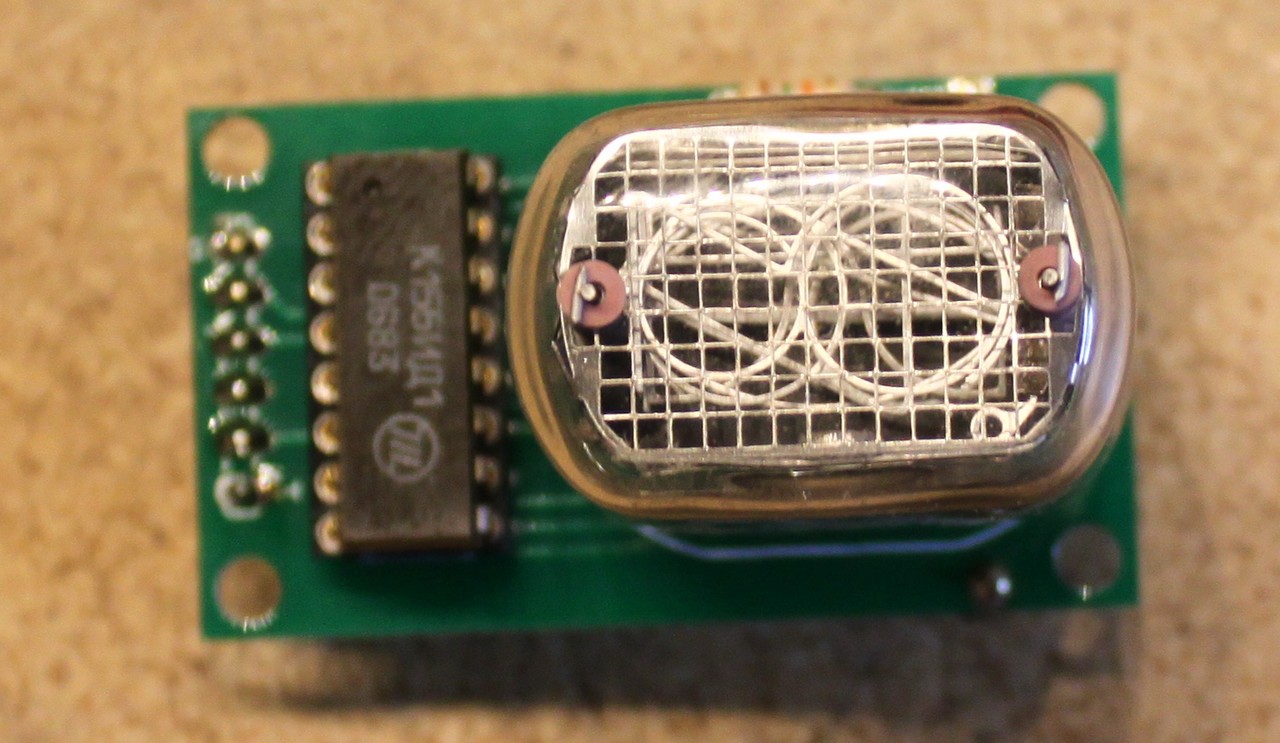
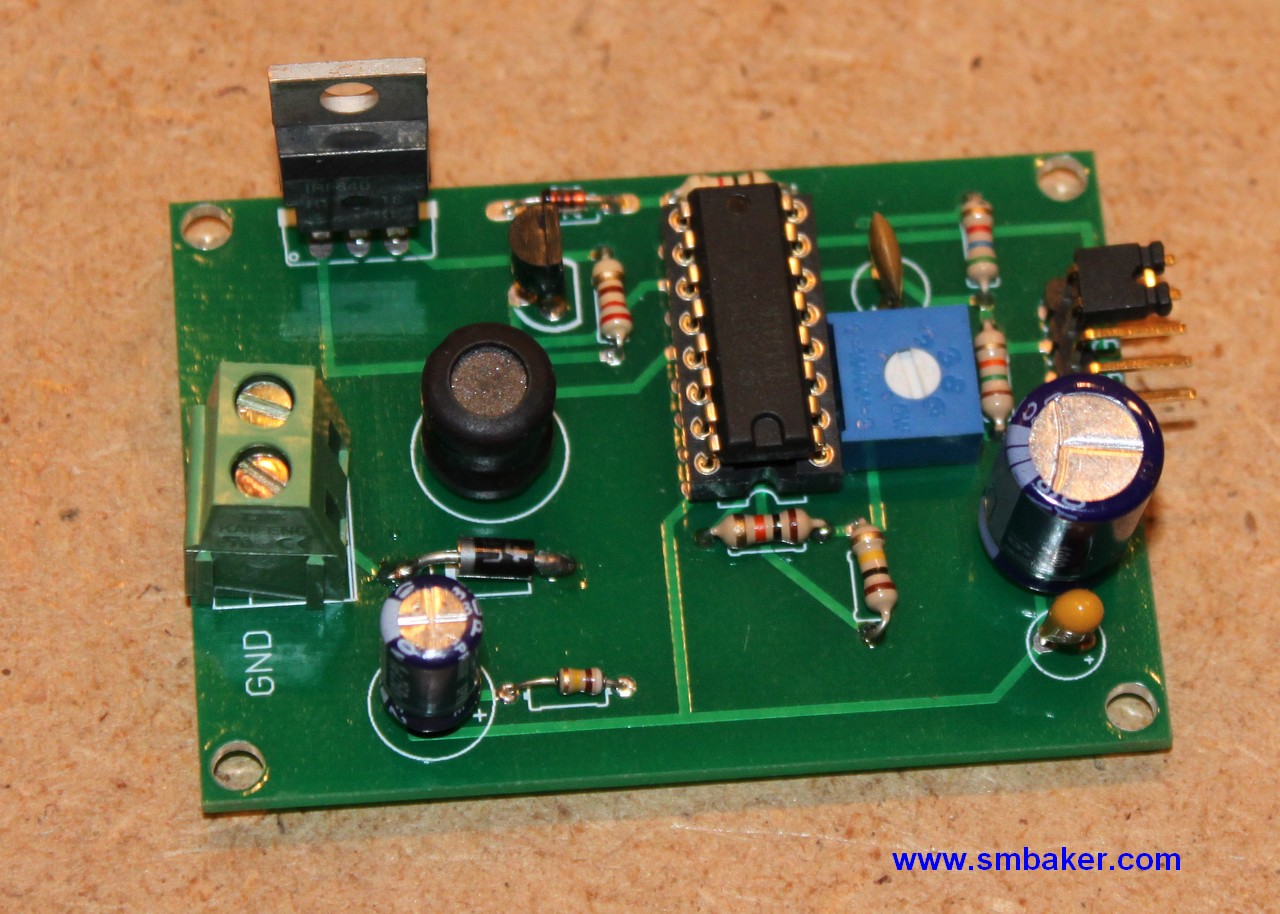
I started with two building blocks I already had, my generic Nixie Driver Board and my HVPSU board:
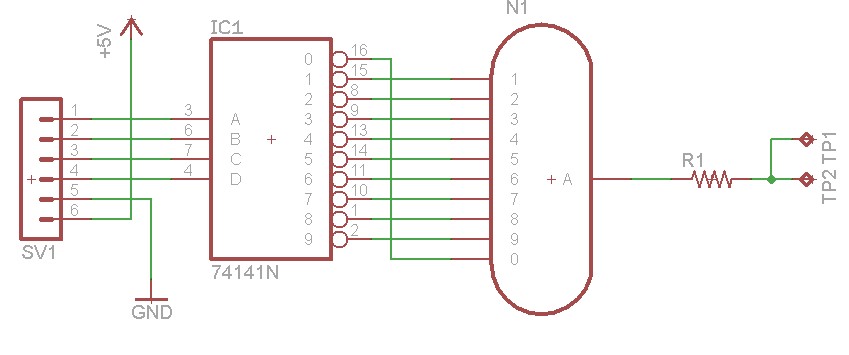
The HVPSU is described elsewhere on my blog, but the Nixie Driver board is something I haven’t discussed before. I designed the driver board for simple Nixie Tube prototyping. It combines the tube itself with the driver IC (either a 74141 or the russian variant, K155ID) and the anode resistor. The schematic for the driver board is pretty simple:
Note that the power and ground pins on IC1 aren’t shown. The 74141 is a basic Nixie Driver IC. It takes a BCD input on pins 3,6,7, and 4, and enables the appropriate anode on the tube. The anode resistor (R1) is used to control the current to the tube. I selected an anode resistor of 15K and an anode voltage of 170V. Most Nixie Clocks you will see are multiplexed, with one 74141 dirivng multiple displays and transistors being used to switch the anodes very quickly. My Nixie Raspberry Pi clock prototype doesn’t use multiplexing because the number of GPIO on the Pi is relatively limited. So let’s see how we can drive lots of Nixie Tube pins from just a couple of Raspberry Pi IO pins.
TP1 and TP2 are where the high voltage connects to the driver board. I used two pins so it’s easy to daisy-chain the high voltage connection to multiple digits.
Let’s talk about Shift Registers
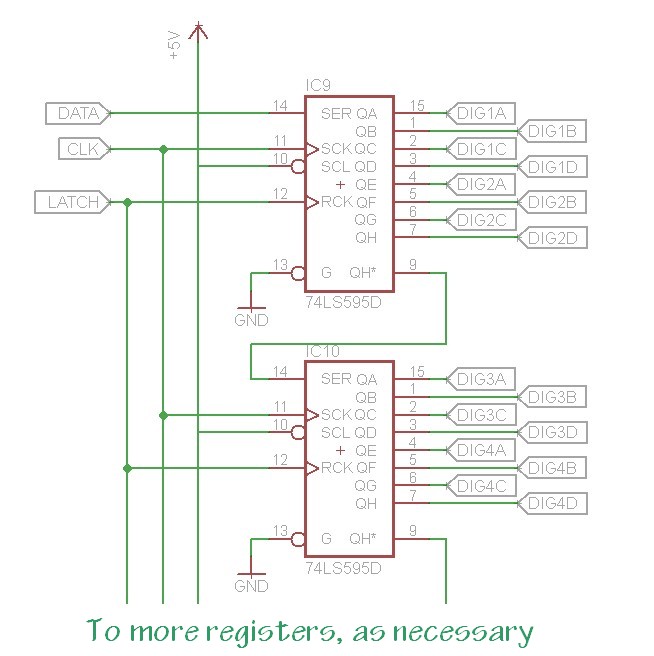
A shift is a serial to parallel device, and we can use it to turn a couple of IO pins into a great many IO pins. Let’s see how:
As with the driver schematic, note that the GND and VCC connections to the 74HCT595s aren’t shown.
A shift register is a serial-to-parallel device. Data is fed into the shift register using a data pin and a clock pin. Each time the clock goes through a low-to-high transition, the state inside of the shift register is shifted left one bit and the current value of the data pin is loaded into the lower-most position of the shift register. Let’s go through a quick example and assume we want to store the decimal number “93” in the register. In binary, this is 01011101. We start shifting from the most significant bit.
| clk pin | data pin | shift register value |
| 0 | 0 | 00000000 |
| 0->1 | 0 | 00000000 |
| 0->1 | 1 | 00000001 |
| 0->1 | 0 | 00000010 |
| 0->1 | 1 | 00000101 |
| 0->1 | 1 | 00001011 |
| 0->1 | 1 | 00010111 |
| 0->1 | 0 | 00101110 |
| 0->1 | 1 | 01011101 |
In the table above, I showed the clock pin as it goes from 0 to 1, but omitted the transitions from 1 back to zero for brevity. As we can see, in 8 clocks we were able to load our value 93 into the shift register. Once we have the value we want loaded, then we transition the latch pin from 0 to 1, and the shift register value will be copied to the output pins, and in turn displayed on our nixie tubes.
Shift registers can be cascaded by connecting the output of one register to the data input of the next register. This allows us to get 16 pins of output from only 3 pins of GPIO on the Pi.
Connecting the Pi
In my prototype, I’ve made the following connections to the Pi:
| Pi Pin | Shift Register |
| GPIO 23 | DATA |
| GPIO 24 | Latch |
| GPIO25 | Clk |
| +5V | VCC |
| GND | GND |
The Code
Now let’s write some code. I’m a python programmer, so I’m going to use the Python GPIO library to implement my clock:
"""
    Raspberry Pi Nixie Clock Prototype
    Scott M Baker, 2013
    Home
"""

import RPi.GPIO as GPIO
import time
import datetime

PIN_DATA = 23
PIN_LATCH = 24
PIN_CLK = 25

class Nixie:
    def __init__(self, pin_data, pin_latch, pin_clk, digits):
        self.pin_data = pin_data
        self.pin_latch = pin_latch
        self.pin_clk = pin_clk
        self.digits = digits

        GPIO.setmode(GPIO.BCM)

        # Setup the GPIO pins as outputs
        GPIO.setup(self.pin_data, GPIO.OUT)
        GPIO.setup(self.pin_latch, GPIO.OUT)
        GPIO.setup(self.pin_clk, GPIO.OUT)

        # Set the initial state of our GPIO pins to 0
        GPIO.output(self.pin_data, False)
        GPIO.output(self.pin_latch, False)
        GPIO.output(self.pin_clk, False)

    def delay(self):
        # We'll use a 10ms delay for our clock
        time.sleep(0.010)

    def transfer_latch(self):
        # Trigger the latch pin from 0->1. This causes the value that we've
        # been shifting into the register to be copied to the output.
        GPIO.output(self.pin_latch, True)
        self.delay()
        GPIO.output(self.pin_latch, False)
        self.delay()

    def tick_clock(self):
        # Tick the clock pin. This will cause the register to shift its
        # internal value left one position and the copy the state of the DATA
        # pin into the lowest bit.
        GPIO.output(self.pin_clk, True)
        self.delay()
        GPIO.output(self.pin_clk, False)
        self.delay()

    def shift_bit(self, value):
        # Shift one bit into the register.
        GPIO.output(self.pin_data, value)
        self.tick_clock()

    def shift_digit(self, value):
        # Shift a 4-bit BCD-encoded value into the register, MSB-first.
        self.shift_bit(value&0x08)
        value = value << 1
        self.shift_bit(value&0x08)
        value = value << 1
        self.shift_bit(value&0x08)
        value = value << 1
        self.shift_bit(value&0x08)

    def set_value(self, value):
        # Shift a decimal value into the register

        str = "%0*d" % (self.digits, value)

        for digit in str:
            self.shift_digit(int(digit))
            value = value * 10

        self.transfer_latch()

def main():
    try:
        nixie = Nixie(PIN_DATA, PIN_LATCH, PIN_CLK, 4)

        # Uncomment for a simple test pattern
        #nixie.set_value(1234)

        # Repeatedly get the current time of day and display it on the tubes.
        # (the time retrieved will be in UTC; you'll want to adjust for your
        # time zone)
        while True:
            dt = datetime.datetime.now()
            nixie.set_value(dt.hour*100 + dt.minute)

    finally:
        # Cleanup GPIO on exit. Otherwise, you'll get a warning next time toy
        # configure the pins.
        GPIO.cleanup()

if __name__ == "__main__":
    main()
The motivation
Why? … An astute reader would probably ask why I’m using a Linux computer to operate a simple 4-digit display. My first retort would of course be “because I can”. One advantage is that the Pi does give us an easy ability to use NTP to automatically set the clock. Using the Pi is cheaper than one of my traditional Propeller+GPS Nixie Tube Clocks. However, my true motivation is to go on and do bigger and better things:
- A remote Thermometer/Hygrometer. My home automation system currently has sensors for temperature and humidity, and this data is available over a secure TCP/IP connection. Implementing SSL on a Parallax Propeller was a bit more than I wanted to tackle, but doing it on a Pi would be a simple task. Fetch the temperature and humidity from the Home Automation controller and display it on the Nixie Tubes.
- A web counter. I’ve already implemented a web counter using a Propeller and a 10-digit Nixie display board. It would be a lot simpler and a bit more flexible to implement this on a Pi. I’m thinking a wall display board with counters for my primary web sites. Something involving at least a couple dozen nixie tubes. Let’s see how far we can push those shift registers!
Anyhow, I hope this tutorial has showed how easy it is to use the Pi’s GPIO. We’ve managed to bridge the gap between a 2012 Linux computer and some 1960s Nixie Tubes.
I saw your youtube video on this clock, and I must admit it is a very interesting project. I have built several clocks using kits I have picked up here and there, including one that uses Ardruino to run the clock. I guess I have another that I have to build now. Thanks for showing this off for us.
Dr Baker,
Thanks for this post – just what I needed!
I just found this via google while researching how to build my first ‘homebrew’ nixie clock. I built a mains powered kit clock many years ago and bought a load of spare tubes of various types and some driver chips, intending to make my own micro controller powered clock, however life got in the way and all the nixie stuff stayed in a box for years.
Having recently rediscovered my ‘nixie box’, I’ve decided to get a clock built using either a Pi (I have several doing various jobs in the house) or perhaps an Arduino (not played with one of these yet but they look interesting).
Your blog has given me enough basic theory in the hardware design (where my knowledge is sadly lacking!) to get me started.
Thanks!
Best
Matt
Dr. Baker,
Awesome post, I was wondering if you could let me know how to make, or where I can get the board’s that your 12 IN tubes are plugged into. The power with the IC all on one board like that. Please let me know.
Thanks
Hi there, did you use any kind of CAD for those boards (esp the generic nixie driver board)? I am very new to electronics and that looks very nice to steal 🙂
Thanks
Mike.
Hi Mike, I used a program called “Eagle” to design the boards. There are many tutorials for using Eagle on Sparkfun if you’d like to try some designing yourself.
Hi Matthew, I designed those ones myself. I don’t really sell any of the boards that I make, but I’ll see about taking the time to put up some of the gerber files if people are interested.
I’d be very interested in the gerber files for the Nixie Driver (and the HV PS as well)!
Great writeup thanks for the info.
Awesome post. I actually attempted this clock with a Raspberry Pi 2 my first Pi project. I was able to get everything wired up on my breadboard, but, I haven’t been able to get the digits to display anything but 9700.
I’m connected to GPIO pins 23, 23, 25 but nothing happens. Any pointers
After playing around and restudying the post I discover way it would only display 9700 I was plugged into GPIO.Broad and not .BCM as you mention. I was able to get the test pattern running.
However, the section;
“# Uncomment for a simple test pattern
#nixie.set_value(1234). ”
I have t gotten to work.
Also it hasn’t displayed the time it just stays in the random number cycle the sets back to 4 zeros
Hey Rivers,
When you uncomment the nixie.set_value(1234) line, you should probably put a ‘while True: time.sleep(1)’ line after it. If you leave the existing while loop in place, then it will immediately overwrite the 1234 test pattern. It’s been a while since I worked on this project, but I don’t think I ever had a random number cycle pattern built into it. If you’re getting random numbers, then I’d suspect something is wrong with how the data is getting put into the shift registers. I would double-check that the clk, data, and latch pins are connected to the correct pins on the raspberry pi.
Dr. Baker, thank you for the reply. I retraced my signal flow and discover one minor missed connection and on major mistake. First my data and latch were crossed and majorly, I (not knowing til now) how shift registers actually work. I configured my registers 1-2 and my nixie’s 1-4, left to right instead of right to left. Now that it is up and running, could you point me in the direction of how to fully understand the operation of the shift registers and k1551D1 so I can create scripts like the ones you displayed in your June 2013 video where you introduced your nixie shield and scrolled the digits in the tubes one by one and then all. Also would like to have the the Pi grab forecasted temperature from the Internet and not from a sensor. But I have yet to find info on that. None the less I am please with my simple clock. No to add complications. Thank you.
I used your code and changed it a bit for a 6 tube clock based on shift registers and a raspberry pi zero. If someone needs the adjusted code, it is on my website. (and it is linked to here)
Thank you.
Hi Mr Baker,
Thank you for publishing the detail on this project and i have used the provided script on my project and the results is a bit funny and weird:
The raspberry pi prints in a shell the following:
20:14:45 as in hh:mm:ss
The nixie tubes are displaying the following:
54:41:02 as in ss:mm:hh where ss, mm and hh have been reversed as well.
I thing with my limited knowledge it comes down to on in the entire script that may correct this situation, this is as follows:
nixie.set_value(dt.hour*10000 + dt.minute*100 + dt.second)
I’m sure if this line is rewritten in the correct way some the tubes will display the time in the correct format:
hh:mm:ss instead of displaying the time upside down and in reverse.
therefore the when enabling the test pattern in this way nixie.set_value(654321) the tube display 123456 if i reverse this to nixie.set_value(123456) i get 654321
if possible would you be able to assist or make any suggestion that would correct this.
Regards
Drew
Hi Mr Baker,
I have with some major help finally managed to get it to work correctly.
Regards
Drew