This post describes my experiences rebuilding an 002 transaxle. I’m going to document the effort as a trial attempt to produce a video that show the rebuild. Everything in this video is from a fresh perspective of someone who has never rebuilt a transaxle before (me!), so if it seems like I don’t know what I’m talking about, then that’s probably true.
Part 1 – Tools
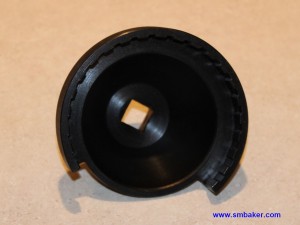
Let’s get started discussing tools. Unfortunately, rebuilding a transaxle is going to require a whole bunch of special tools that the average person does not have. Expect to spend a minimum of $400 to get yourself a pinion bearing retaining nut socket (69 and later) and a jig/basic tool kit. The jig is necessary to realign the shift forks near the end of your rebuild. Unfortunately, you can’t align the shift forks once it’s put together, so you need to use the jjg to align them, then disassemble the jig and finally reassemble the transaxle. While you can cut up an old case and make a jig out of it, this presumes you have an old case laying around.
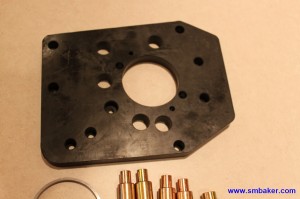
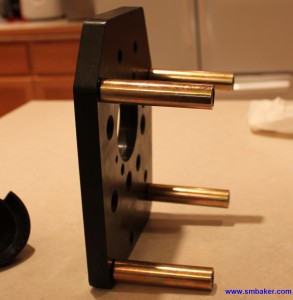
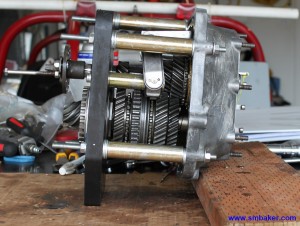
Unfortunately, I have to give a word of caution about this bugpack jig pictured above. Mine suffered from at least 3 different problems during the rebuild:
- The standoffs were the wrong length. With the little black plastic spacers added, they were STILL the wrong length. I ended up going to the hardware store and picking up an assortment of washers to pad them out to the correct length. Make sure to measure the case end to bearing seat distance in your transaxle case and compare it to the distance in the jig. Don’t assume the jig will setup this distance correctly.
- The mounting spot for the standoff for reverse (reverse gear rides on a standoff that mounts to the jig) is not in the correct place. The clearance between reverse and the pinion shaft was thus too tight, and reverse would not engage in the jig. Fortunately, reverse worked just fine once the transaxle was reassembled. Nevertheless, this problem made the jig useless to me for any reverse-related adjustments.
- There is no support for the back end of the 1-2 shift rod. The hole is at least twice oversize. I’m not sure if they expect a guy to fit a bushing in here or what, as there were no instructions. With no support, the rod is a bit wonky while trying to adjust it.
- Hole for the mainshaft was a little under dimension. It took some minor clearancing to get the mainshaft so it could spin freely.
- Given the above problems with things not being in the right spots and/or the right length and/or the right size, it makes me wonder if anything on the jig is positioned properly. Do I have confidence that it’s holding the clearance correct between main and pinion shaft? not really. There are lots of VW parts one buys knowing one has to do some final fitting adjustments, but a jig is not one of those things. A jig needs to be correct, it’s the whole purpose.
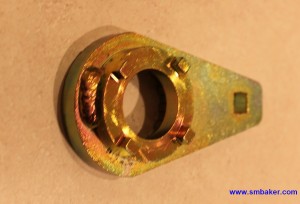
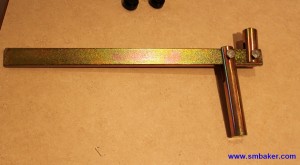
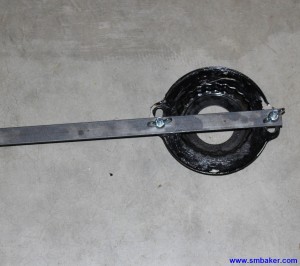
On my year 002, the side covers thread in. Lacking the proper socket, I tried loosening it with a hammer and chisel as the haynes manual suggested. It was much easier to just bolt a metal bar to the side cover retaining bracket and use it as a makeshift tool:
In part 1 of the video, I cover the tools:
Part 2 – Major Disassembly
Now that we’ve covered the necessary tools, the next step is to get the transaxle removed from the vehicle and start the major disassembly. The following video covers the steps I took to break the case apart and remove the major parts from the transaxle.
Part 3 – Shaft Disassembly
Now that we’ve got the parts out of the case to the point we can work on this, it’s time to do the fine disassembly. In this part, we’re going to take the main shaft and pinion shaft out of the gear carrier, and separate all of the gears and other parts from the shafts.
Part 4 – Gear inspection with microscope
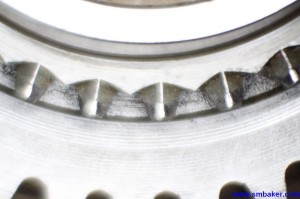
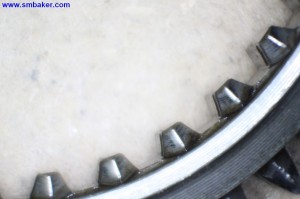
The particular problem we were having was the transaxle not wanting to engage first gear. So, the first thing I did was take a close look at first and the 1-2 slider. First gear doesn’t look all that bad in the picture below, but visual inspection of many of the teeth showed it to be worse than this particular picture. The leading edge was worn down a bit flat, and there were several teeth that had severe pitting.
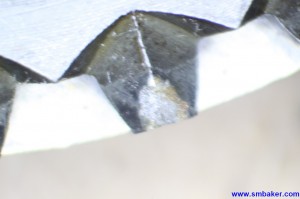
Next up is the 1-2 slider. It wasn’t as bad as first gear:
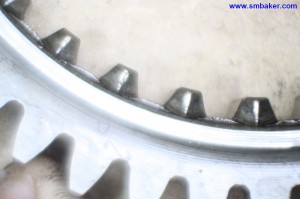
Third gear looked really ugly, which is odd, because 3rd wasn’t having issues sliding into gear:
In part 4 of the video, I show the gears being inspected in the stereo microscope.
Part 5 – Shaft Reassembly
to be done…
Part 6- Jigging and Shift fork setup
To setup the shift forks, you need a jig (see the tools section). Unfortunately I had a few “issues” with the bugpack. First off, it’s critical that the jig must setup your shafts exactly the way they will be setup in the case. Note that the pinion shaft is located front-to-back by the jig. If the brass spacers push the jig plate too far back, or too far forward, then your pinion shaft will be mis-positioned, and you will set the forks to the wrong spot.
What I did was to take my case and measure the distance from the end of the case to the surface where the pinion sits. If memory serves, in my case this was about 107mm. Your case may differ, so check it yourself (I’ve heard 106mm on the forums). Then, take the spacers from the jig kit and do whatever you need to do to make them work. I ended up stopping by the hardware store and picking up a selection of washers to pad the spacers out to the right length. Check, double-check, and triple check that you got this right.
Make sure to tighten down the pinion bearing nut (I used one of the aluminum spacers right before the nut; click the picture below to zoom in and see). You don’t need to torque it to spec. Just get it tight to make sure there is no play and the pinion shaft is located properly. Your shims should be installed. Also make sure your mainshaft bearing is sitting where it’s supposed to be. Check, double-check, and triple check your measurements. Remember that you’re aiming to reproduce the configuration exactly was it will be in the transaxle case.
Here is a picture of the setup jig:
Once you have it in the jig, you’re going to test the shift forks. Shift into first (or second), tighten down the 1-2 shift fork, feel the play/wiggle in the slider when it’s engaged. Then, shift it back to the other end and feel the play. What you’re aiming for is the same feel for both first and second. Once it’s equal, neither side should be pushing in hard. Repeat the whole thing with the 3-4 fork and slider. I found it to be much easier than anticipated. Make sure to torque the bolts to spec once you’re done — you don’t want to forget and reassemble your transaxle with loose shift fork bolts!
Here is a youtube video of the gear train in action:
Part 7 – Final Reassembly
I didn’t actually take any pictures of the final reassembly because by and large it’s a process of reversing most of the stuff you did during the disassembly. I highly recommend you purchase something like the Long Enterprises transaxle rebuilders course (see http://www.longenterprises.com/), it’ll tell you a lot of small things to do during the reassembly process that I forgot. In particular, you’ll need to pay some special attention while putting the gear assembly back in the case — there’s some work to do with heating the case, lining up the pinion bearing, etc. The long CD explains it very well and in detail, and I was surprised about how well the technique worked.
Hi Dr.Baker, Were you ever able to find an accurate jig for your 002? I am pulling my hair out trying to find one that is not a bugpack, but I cannot. Is my only other option to buy an 002 case and cut it up. Please, please help. Totally awesome video and very helpful. You are a rockstar. Thank you. Todd
Hi Dr Baker, where I can get the tools to repair the vw bus trans? Do you have the drawing of the plate?